

Frame.io As An Animation Review Tool

Frame.io - Animation's Friendly Review Tool?
Introduction
I recently helped out a colleague studio to set up their animation review system. They had heard of Frame.io but haven’t used it or anything like it. I’ve used a few of the shot tracking/review apps such as Shotgun, F-Track, Kitsu, Harmony Producer, etc. but Frame.io’s been a go-to app that’s quick to set up, fairly shallow learning curve, and economical. I also like it because it’s primarily for video footage review, whether for live action or animation. Animation pipelines require a bit different set up because the start of the production begins with a “locked animatic” (approved edit).
This article is primarily for a 2D pipeline but can easily be modified for the more extensive 3D and Stop-Motion pipelines. We’ll briefly go through how to set up Frame.io and how to get around it but as stated, it’s a fairly easy learning curve that a relevant Youtube review can quickly get you sorted.
We’ll go through the following topics:
- Obtaining Frame.io
- Setting Up the Frame.io Workspace and,
- Animation Folder Workflow
- Frame.io Through Adobe Creative Cloud
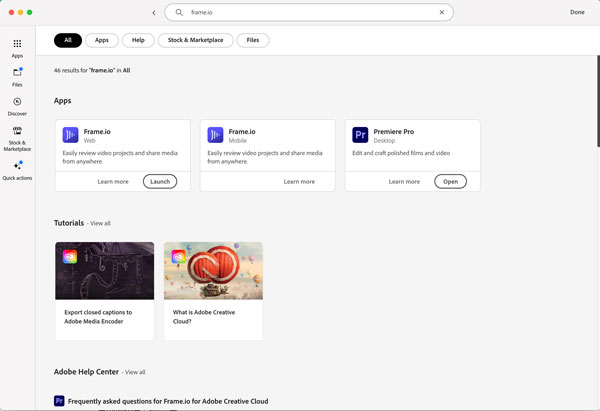
1. Obtaining Frame.io
Luckily, obtaining Frame.io is quite easy. It can be set up from their site at frame.io. And because Adobe acquired it, you can access it through Adobe’s Creative Cloud which integrates easily with Adobe Premiere, and other editing software such as Final Cut, Avid’s Media Composer, etc. If you get it through Adobe, it includes 2 users, 5 projects, 100 GB of storage, and integration Camera to Cloud.
It also integrates with Slack which, if you haven’t used, is a great way to organise communication between departments along the pipeline. What’s great about using Slack is that in Frame.io’s comments, you can put a hashtag “#” in front of a department name and that note will show up in the corresponding Slack channel. Example, “#Editing – Split this scene into 2 – thanks.” This will automatically be sent to the Editing Channel, and it can also be sent to Production Management so they can get it on their tracking system.
2. What Frame.io is and is not.
Frame.io is primarily an online video footage review app. It’s not the best for tracking shots, asset management, etc. Much more costly apps such as F-Track, Shotgun, and Harmony Producer will do the video review plus all the tracking, scheduling, and asset management. Frame.io’s great for small to mid-size productions that need to curb their costs. For the productions I’ve set up, we use Google Workspace for the tracking system (that’s another article).
3. Pricing
You can go to the Frame.io site and check the pricing but it is a per seat subscription which can be monthly/yearly. They have package plans that set up bands of pricing for multiple user packages. Unless I know the production will go on longer than a year, I always opt for the monthly. It’s easier to get out of but, depending on the savings of the yearly subscription it may work out that a yearly option is the more beneficial.
4. Roles
There are 2 types of roles: Team Members and Collaborators – both require being paid members. There is a 3rd type of person who can use it, but they don’t have to be a paid member, that is a Constituent. This role is basically your Client, whoever that is: broadcaster, creative agency, distributor, etc. The Constituent can receive a share link in either a Review or Presentation mode, (more on that later).
Here’s the basic breakdown:
Team Members – (Paid) Usually in-house crew that can do everything – renaming, delete projects, and give permissions.
Collaborators – (Paid) This is usually for temp people and vendors (Oversea Studios). They can open files, play them, add comments, publish it, and change status but they’ll need Team Member permission to share it with Clients, download, invite other collaborators.
Constituent – (Free) Depending on which mode of link they get, they can:
Review Mode – Make notes/comment on work in progress and access as files as the link allows. Or, . .
Presentation Mode – Usually this is just for viewing finished video. They can only access one file at a time. The presentation interface can be customised, so it has the studio’s branded colours.
5. Setting Up the Workspace
Now that you’ve set up your Frame.io account and are looking at the Demo project – what to do next? A lot depends on how your studio or operation works. I’ll show you how I set it up but that doesn’t mean it’s the best way. Please feel free to modify whatever’s presented – there’s many different roads to the end of production.
A. Layers and Folders
Unlike sharing folders on a server, with Frame.io, you have the option to stack your footage versions in Layers. Depending on your needs, it may work best that you put all the versions in a folder unstacked. But I’ll go through why Layers are wicked pissah (Bostonian for ‘good’). The first thing you need to understand, to get the most out of layers is that the versions must be the same video length with matching/synched timecode. This is only way to make sure that as you compare versions, you’re looking at the same video at the same timecode.
B. Editing
In this article, I won’t go into detail how to set up the editing timeline – that’s another subject to address later but – it’s good to know a few bits of info and specs you’ll need for the footage intended to upload to the project file.
Length/Timecode – As stated above, to stack versions and be able to compare between them, their length and timecode need to synch.
Shot/Scene Numbers – Depending on your studio’s “File Naming Conventions” (yet another issue worthy of its own article), it should include the scene or shot number (some studios use both). Some studios include a sequence number in the name, but the file name starts getting very long.
Version Numbers – As you review the animation and make notes, how do you know what clip to review? Well, that’s easy! You review the latest version, hence the reason why you need to include that info in the file’s Naming Convention, (a version or a take number). If I’m asked to review the 3d version, I will look at the clips that end with a “V3”or whatever you suffix you give to distinguish versions.
Frame.io Workspace
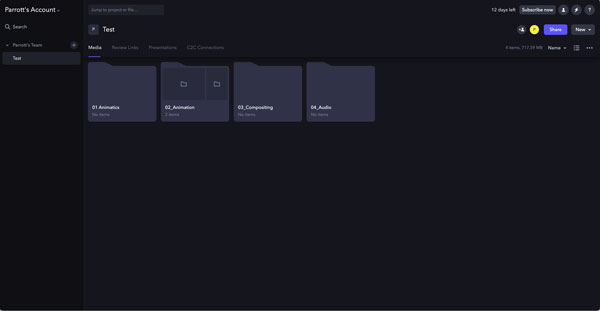
6. Folder and Layer Management
The image above shows a basic folder layout in Frame.io. Like all folder systems, you can double click into it and have more folders. As mentioned above, what’s great about Frame.io is that they allow version stacking, making the folders clean and easy to view inside them.
This is my basic folder set up but please feel free to adopt whatever folder organisation you’re used to. A word of caution though. Over the years I’ve noticed that sometimes a production crew get into hyper-categorising folders with sub-folders, and sub-sub-folders. They fine tweak the system so much, it loses its simplicity.
To an organised person (i.e. Left Brained People), the system may look like a marvel of logic but to us Right-Brained types, it’s a labyrinth of folders. Too many choices causes schedule conscious artists to start dropping assets into incorrect folders, insisting that they submitted it – which is true but, it’s not in the correct sub-sub-sub-folder. Keep it simple! You can use some permissions to make sure people can’t modify a folder but if the system is simple and as fool proof as possible, it’ll run way smoother with less headaches.
PRO TIP 01:
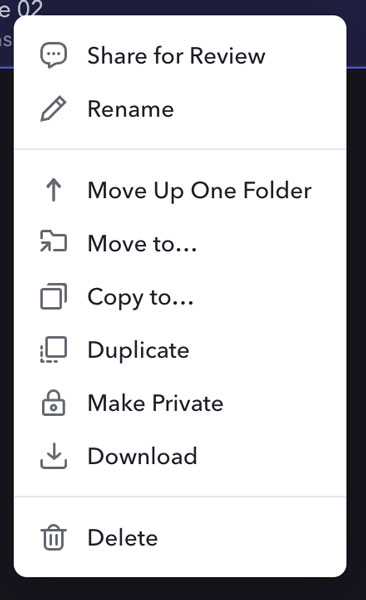
Once you’ve set up a master folder that contains sub-folders for all the episodes, the last thing you want to do is remake those folders again and again, especially if you have 52 of them. Frame.io has an answer to this – Duplicate, Copy and Move To. Just select the folder with all the episodic sub-folders, right-click, and chose the option that works best for the task: “Move To . . .” “Copy To . . .” and “Duplicate”. You can do other things in the pop-up window too.
Here’s a description of my basic folder breakdown:
- Animatics – This folder is for the process of getting your animatics locked. It usually has comments from a Broadcaster or other Stakeholder that you may want to keep private. Once it’s approved or as they say, a “Locked Animatic” then it can be duplicated and sent to other folders as the foundation layer.
- Animation – You can break this into sub-folders such as “Rough Pass/Blocking” “Character Animation” “2D Effects/VFX” or the Roughs, Character Animation, and Effects can be stacked on top of one another. This latter approach might get a bit confusing with all those layers though.
- Compositing – Fairly straight forward but again, this can be broken into sub-folders per the pipeline.
- Audio – This folder can be broken into sub-folders “Music Review” “Sound Mix Review”

7. Animation Review Workflow
Now that you’ve got your fancy schmancy folders all organised and populated with episode folders and footage, let’s go through how I perform my review.
There are wonderful instructional YouTube videos on how to use Frame.io’s UI effectively. I highly recommend going through it once in a while because I discover it can do some cool stuff plus, they update its functions.
A. Stacking Versions
Stacking versions is wicked simple, with the video files all in the same folder, choose the one that’s going to be the bottom layer. Choose the one that’ll be the next layer, click and drag/drop it on the first layer and – Whallah! You’ve just made a version stack. You can tell it’s stacked by the little “Vx” button on the top right corner of the thumbnail.
B Review Tools
Here’s just a small list of basic Frame.io tools you can use to get around the footage:
- Moving along the timeline: You can scrub along it, or even better us the “J K L” keys to move back, forth, stop and multiple frames.
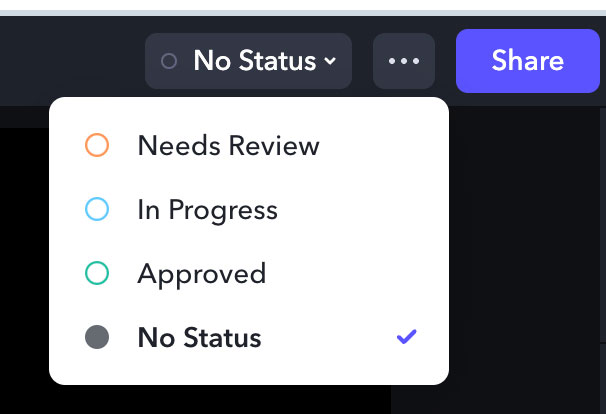
- Status – This can be set to “No Status” “Approved” “In Progress” and “Needs Review” This is one of Frame.io’s shortfalls. Our Shot Tracking works on a traffic light system. It would be great to have the option to customise Status so it reflects our system.
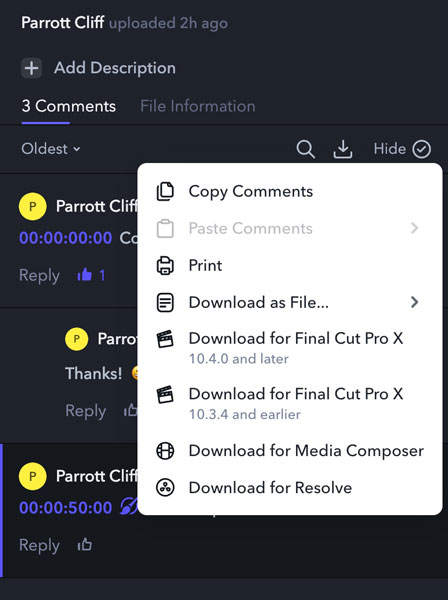
- The Three Dots! It’s located next to the Status Box. If you click the infamous 3-Dots, you’ll be able to “Download” “Make Private” “Reveal In Project” and “Delete”
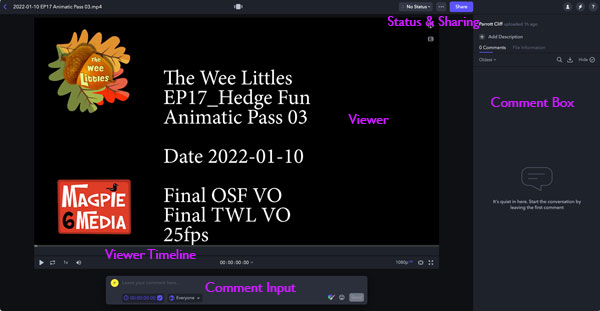
- Comments & Information Box – Next to the Viewer, there’s a box where the Comments reside. At the top, you can “Add Description” such as the episode name and whatever info you’d like people to see. Next to the Comments Tab is the File Information Tab. This gives info on the video file.
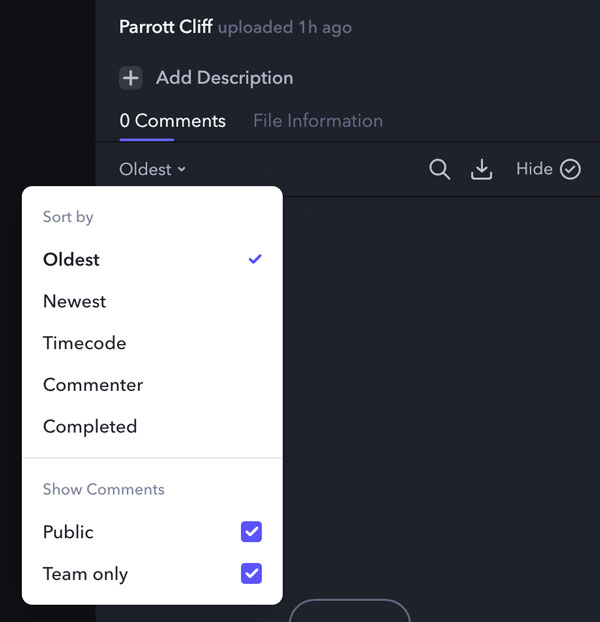
- Sort-By Box – Comments can be filtered in the drop-down box under the Comments Tab. With this you can view the comments in various ways by; “Oldest” “Newest” “Timecode” “Commenter” and “Completed”. In this box you have options to restrict comments to just Team Members or “Public”
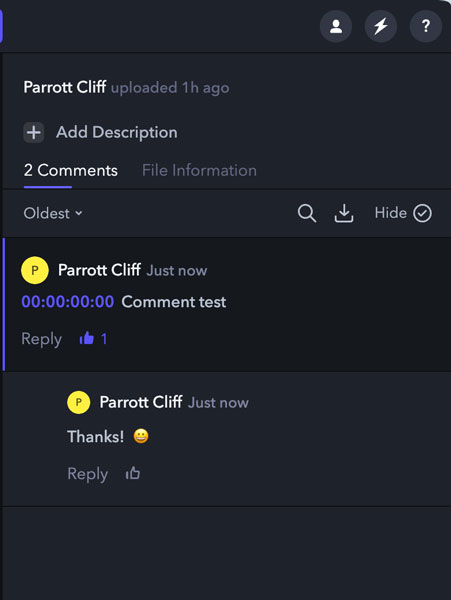
- Comments – This is where all the action is! Comments, and Replies to Comments, live here. As Comments are made by typing in the Comment Box at the bottom of the Viewer, they automatically get synched timecode (not necessarily your editor’s timecode but, Frame.io Player’s timecode). The person making the comment is aptly named a “Commenter” which comes in handy when you use the “Sort By” filter and check the “Commenter” option.
These Comments can be download as text files to be imported to a tracking system.
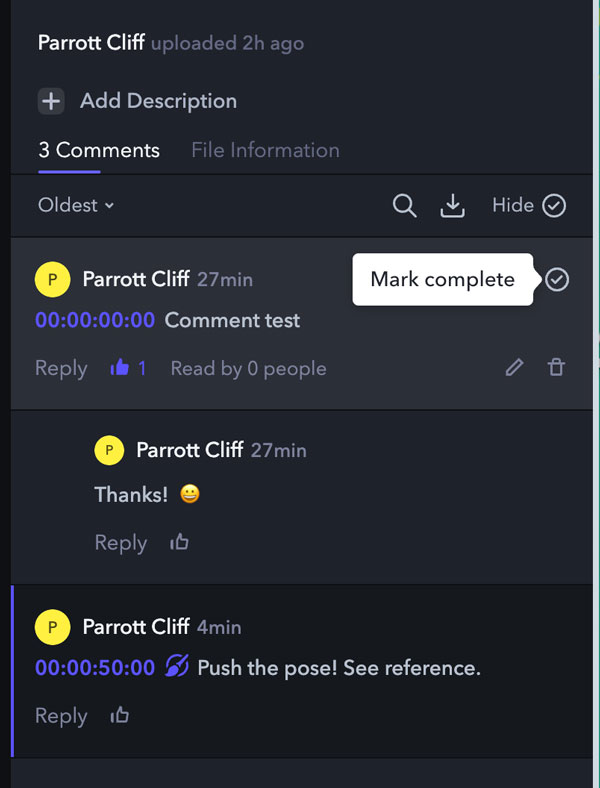
As an Artist fixes the shots, they can check it, marking it off as complete by clicking in the “Mark Complete” circle.
- Comment Input Box – At the bottom of the Viewer is where the Comments and Drawings are created. Once it’s written, you click “send” and it appears in the Comment Box on the right. The note can be made a general note by clicking on the purple timecode, turning it off. The comment can also be restricted to team members. Having a drawing tablet makes things way easier to draw out comments but I’ve managed to use just a mouse at times. The drawing tools are primitive but effective. If you’re one for emojis well, you’re in luck because Frame.io’s got loads of them (not partial to emojis myself 😡 ).
PRO TIP 02:
The Magic Of #Hashtags! If you’ve integrated to Slack, these really help keep communications organised. For instance, while making Comments for Character Animation, you see that there’s something the Editor needs to fix. By adding the hashtag prefix to a Slack channel name, that comment will automatically load to it. So with a comment like, “#Editing – The scene needs to be split – thanks!” The comment will show up in Slack’s Editing Channel. The same way it works in Slack when you put a hashtag in front of someone’s name. You can use any hashtag that works for your pipeline: #Effects, #Compositing
8. Review Methods and Issues To Check
Sweatbox – Each production has many issues to review when going over animation footage. I’ve worked at some of the larger LA studios and one of the practices that really works well is an animation industry phenomenon referred to as “Sweatboxing”. And no, it’s not a sweaty producer and a sweaty animator squaring off with leather gloves, though that could be very entertaining.
A “Sweatbox” is a term coined by Disney animators. It’s the same thing as reviewing “rushes” or “dailies”. The term came about because Disney would review the footage in a small editing suite that got very warm. It also refers to how nervous the animators were when their shots were reviewed – sweating bullets. But most animation reviews happen remotely which is why apps like Frame.io come in so handy. If you want to recreate Disney’s sweatbox, next time you have to review animation, bring your laptop into a stuffy closet under a stairway like Harry Potter and have fun.
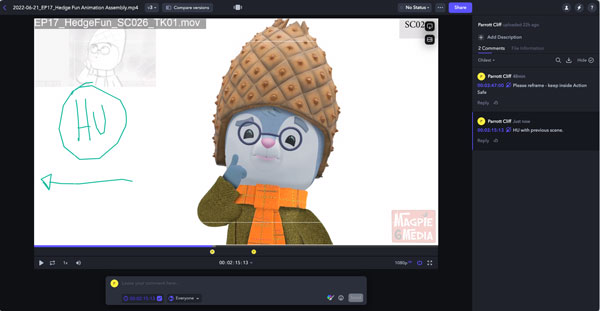
What was great about sweatbox was the many eyes peering at the shots. I learned loads of what to look for by listening and seeing what people in the room were catching. There was the omnipresent Hook-Up problems. It was like a game to see how many HU’s you could get compared to the sharpest eyes in the room.
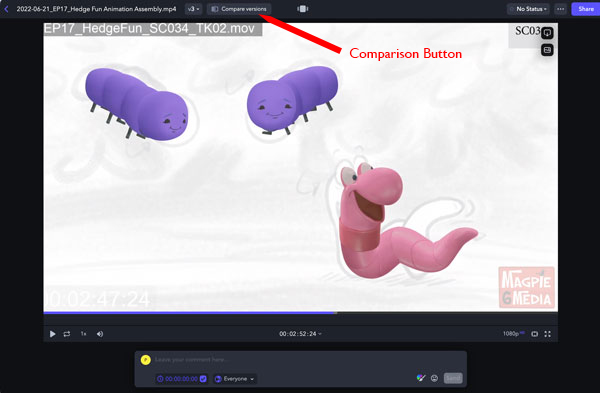
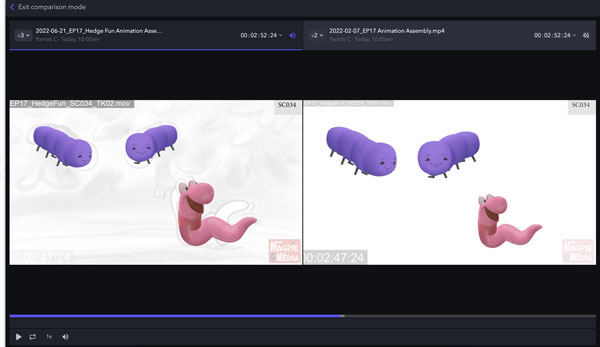
Version Comparison Tool – By stacking your versions as layers back in paragraph 7a above, you can now take advantage of the Version Comparison Tool. This is a great tool that matches up with some of the really good Footage Review apps like Shotgun. If your versions are synched by length and timecode, you’ll be able to see if the artist did the corrections as noted in an earlier version.
8A. Issues to Review
Here’s just a handful of the most common issues to look for. Special Issues are addressed below.
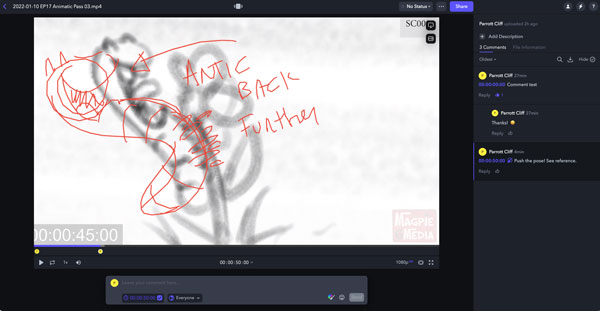
- Framing – Believe it or not, “Action Safe” is still a thing. One would assume that because most are screens are digital, terms like “Title Safe” are a thing of the past BUT, you’d be wrong. Don’t worry, Frame.io’s got you covered with their “Guides” tool. Just click on the guide icon in the bottom right corner and you get all sorts of different guides. In the example image below, I use the common 16:9 Guide. This gives me a really quick/easy check – a no brainer. If the composition of the shot looks too far outside the guide, make a note. The Director may have a different idea and may even like it but as an Animation Director, at least you flagged it.
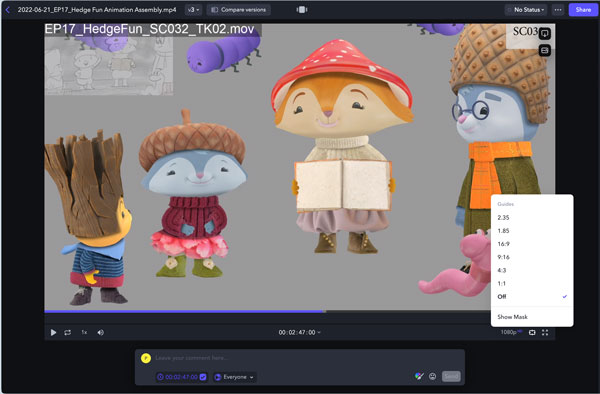
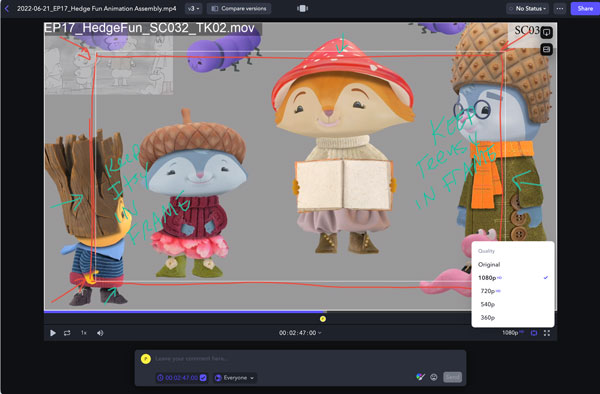
TO NOTE – Next to the Guide is the playback resolution. Frame.io’s even thought of people who don’t have great internet connection. Change the rate so you can see the playback work without rebuffering a lot.
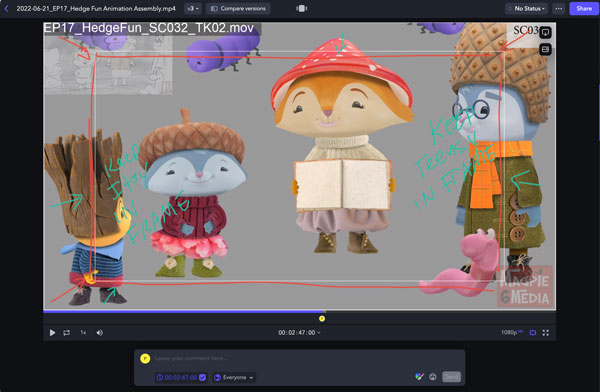
- Hook Ups – It’s a continuity check to see if the character/object between 2 scenes are doing the same thing, facing the same way, in the same pose, eye line is the same, etc. Even though checking to see if ‘everything matches between connected shots’ is straight forward, you’d be surprised at how many HU’s you’ll miss. The eye gets lazy and ironically the “Illusion of Motion” that animation is based on – (our eye sees movement but we’re actually seeing a series of still images at a rate) – fools us into missing Hook Ups. This is why the sweatbox sessions are so good – lots of eyes, all competing to catch a hook-up.
- In shorthand, they’re written “HU” and sometimes I’ll put an arrow pointing to the previous or next scene, meaning ‘Hook Up this pose with the previous scene’ and to be doubly sure, I write it in the Comment Box too.
- Posing – To me, this is the most interesting part of reviewing animation. I like looking at a shot and figuring out, how can this tell the visual story better? Well, Frame.io gives us a primitive set of drawing tools to draw detailed notes .
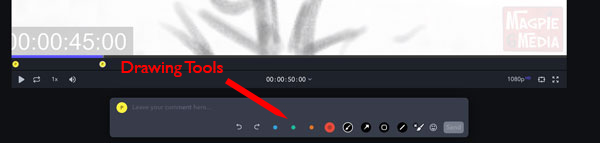
- The tools are located in the Comment Making Box at the bottom. Click on the colour wheel and brush icon, that’ll bring up your options. I mainly use the freehand drawing tools, taking advantage of the colours to distinguish between different types of notes within the same frame. There are shape tools, line tools, and if you’re into arrows, Frame.io’s got you covered with their arrow tool, go nuts and make a quiver (that’s an archery joke).
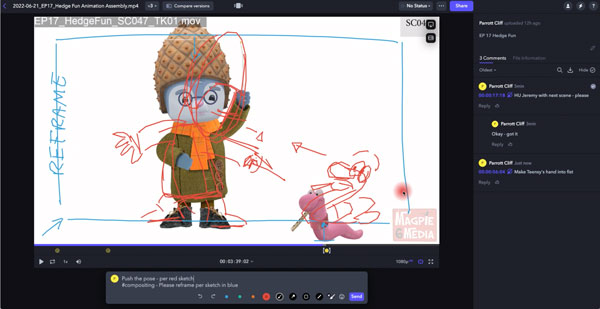
- Most of the posing problems usually deal with pushing mediocre poses but, by utilising Animation 101 Principles such as strong silhouettes, iconic posing so viewers instantly identify a character’s feeling, etc. For this type of note, I’ll always draw the character’s “Line of Action”, another Animation 101 principle. Then I’ll do a gesture drawing – (those years of life drawing classes come in handy here) – making sure to show the character’s centre lines on the body and head if those are at issue.
Other issues to look for are:
- Hand posing/gestures
- Perspective on the Character, Prop and Location
- Emotions are accurate and appropriate (check with or defer to the Director on this one)
- Eye Lines that make sense, and.
- Matching it to what’s been approved in the animatic. A lot of times, board artists draw the best poses but when it’s applied to a rig, it falls short.
PRO TIP 03:
MULTI-NOTE: By lumping together notes into one comment – it’ll save you time, but it can get tricky if there’s too much info and the comment’s confusing. It’s a common sense call – though it may save time, why make notes no one understands so, break the notes up accordingly.
9. Special Issues
- Note Making Etiquette – After going through a particularly rough animation pass, you find yourself seeing the same mistake over and over, it’s natural to get your dander up and start writing sterner wording. Before long, you could find your self writing ALL IN CAPITALS and lacing it with snarkiness! But don’t succumb to your dark side young Skywalker. The artists reading your notes most likely aren’t digesting the mistakes at the same concentration you’re experiencing when you review. Artists will most likely get offended if you write snippy, snarky, and snotty comments. I discovered the best thing to do when you see the same mistake happening is to have an “OVERALL NOTE:” at the start of the footage and let them know you encountered this reoccurring mistake, and you’ve stopped making notes on it at such and such a timecode. Leave it at that.
- Notes & Timecode – Over the years, I’ve learned to be very specific with notes. Instead of writing “Character enters here” or “Character Exits by here” you should write in the editor’s timecode in the comment. Make sure to use editing’s timecode, not Frame.io’s, because the animator will have the animatic that uses the editing timecode. So the same note will read like “Character enters by 01:00:14:13” or “Character Exits by 01:00:19:02”
- Editing Issues – An Editor is going through a lot of info and sometimes stuff will slip by. Some of the most common editing issues are (1) Incorrect Scene/Shot numbering, (2) Misinterpretation of a Storyboard so scenes may need to be split or inserted, and (3) Timecode synch issues.
- To Comp or Not Comp? The poor Compositing Dept. have the sad luck of being the last stage in the animation pipeline. So, if at some earlier stage an issue gets kicked down the road, it’ll eventually land in Composting’s lap. My motto is, “If you can fix it where it started in Boards/Shot Prep/Animation – then fix it there.” Think twice about asking Comp to reframe, an animator can do it just as quickly. But things like camera moves should be done in Comp – they have better tools, more control, and the camera move may need to be tweaked later. If the move was done in Animation, the shot will have to go back there to fix it, and if you’re lucky, the animators are still there.
- Storyboard problems – Poor storyboards and/or animatics issues will quickly snowball into a mess, unless spotted early on. They could be fixed at Shot Prep Stage or in Animation, but the best time is when the board artist is still working on the project. Going through storyboards is a subject for another article but here’s a couple of issues I’ve encountered while reviewing animation.
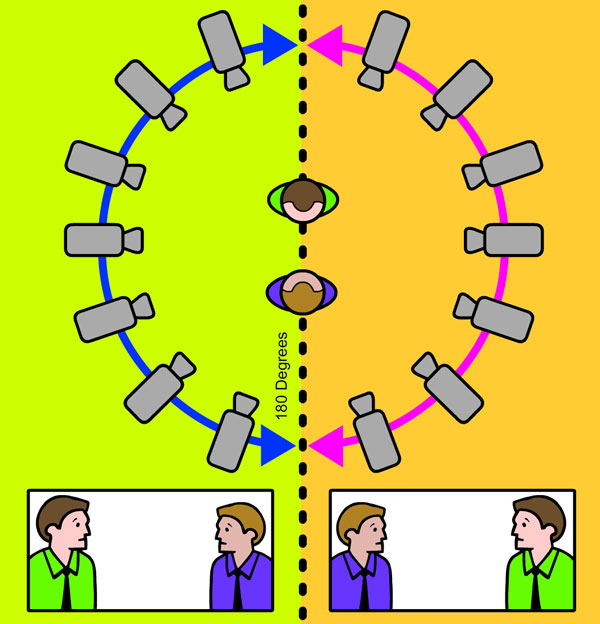
6. The 180 Degree Rule: One of the top issues I catch often is breaking the 180 Degree Rule. If you’re not familiar with it, here’s a brief definition: “It’s a screen direction of spatial relationship between characters/objects. To ensure characters/objects don’t break the rule, draw an imaginary line, and keep your camera angle on just that side between the characters. If a character is screen-west and another is screen-east, then when we cut between shots, they should remain on their respective sides unless you cut to another shot without them. So, if you go from an over-the-shoulder OTS shot, to a mid-shot of 2 characters talking, they can’t switch sides. If you want to switch sides, then you need to cut to a close up of one of their faces, or something else. Rules can be broken but, it’s best to learn them first and why they work.”
7. Where are we? Too many close up shots in a sequence will confuse the audience. We need to pull out wide every once in a while to re-establish where the characters are in relationship to one another.


This article was first published on Parrott.Cliff, the website for the award winning animator, writer, director and producer, Clifford Parrott. Co-author for the go-to book on producing 2D animation with Adobe Animate (Flash), he resides on Ireland’s sunny West Coast surfing and helping his wife Christina run Magpie 6 Media (not necessarily in that order).
2 Comments
Leave a Reply
This site uses Akismet to reduce spam. Learn how your comment data is processed.
vermox ohne unerwünschte Wirkungen in Deutschland
each time i used to read smaller posts which also clear their motive,
and that is also happening with this article which
I am reading now.
venta de granpidam en línea en Colombia
Hi there very cool blog!! Man .. Excellent .. Wonderful ..
I will bookmark your blog and take the feeds also?
I’m satisfied to find a lot of helpful information here within the
post, we’d like work out more techniques on this regard, thank
you for sharing. . . . . .